Improve Usage With Accessibility Features On Mac
How To Use Accessibility Features On Mac
Reduce Motion On Mac
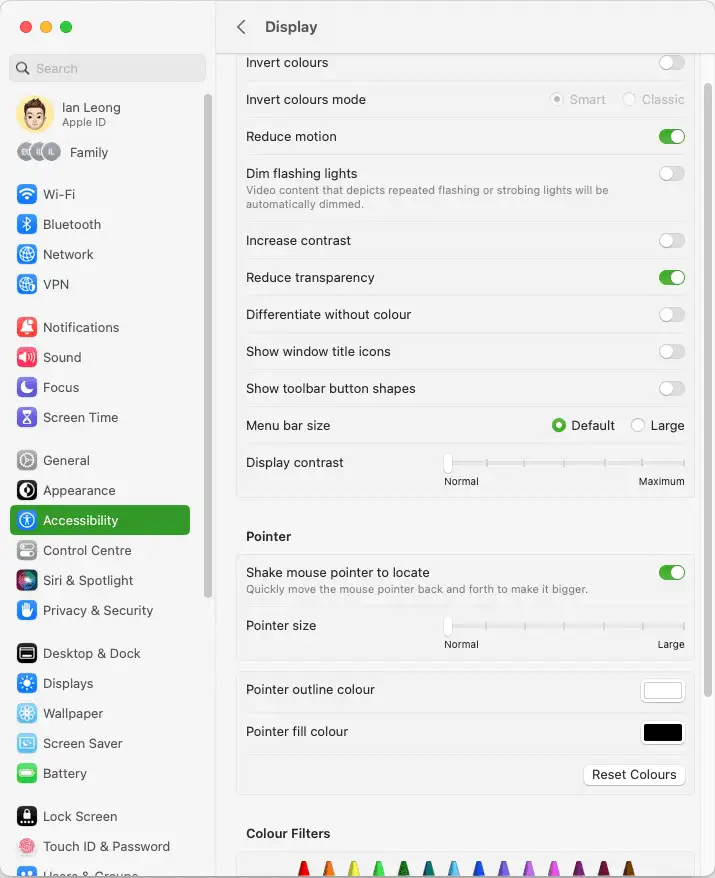
Reduce motion reduces the animation throughout macOS (although it does not remove it all). To activate the feature, click Display in the sidebar of the Accessibility panel. Tick the Reduce motion.
When utilising apps in full-screen mode, the modifications are most visible. When an application enters full-screen mode, the desktop disappears and the app window expands to fill the screen. When switching between full-screen applications, a full-screen slide transition is presented.
Crossfades replace these transitions when decrease motion is enabled. This reduces the likelihood of becoming dizzy when fatigued; yet, others believe the simpler effect looks better and feels quicker (even if the latter is a placebo).
Adjust contrast and transparency in macOS

Some programmes on macOS feature semi-transparent panels and toolbars. If something colourful is placed beneath these surfaces, a hazy approximation of those hues will appear. However, if the content beneath is animated, these areas can quickly become distracting.
In the Display section of Accessibility, enable Reduce transparency. Translucent panels and toolbars will turn opaque (as will the macOS menu bar and its menus, which are otherwise also semi-transparent). On older hardware, this accessibility features on mac may modestly increase performance.
You can further improve readability by activating Increase contrast, which darkens the borders of panes and buttons. However, this impact may be too obvious for certain users, not least since selection colours also become significantly darker.
RELATED : How to Use Accessibility Features On iOS
Enlarge your Mac’s cursor
When the mouse was shaken,’ its pointer temporarily grew in size. This setting is located in the Display area of Accessibility and is enabled by default.
Adjust the Cursor size setting if you frequently lose track of the pointer, which is simple on a larger screen. Normal is the default size, whereas Large is enormous. There may be something in between suits.
Let your Mac speak to you
Macs have been able to communicate for a long time and now have a variety of voices. In the Spoken Content section of Accessibility, you can select a voice from System Voice and download new voices, genders, and accents from the voice selection page accessible via the Customize button. Using the Speaking Rate slider, it is possible to modify the playback speed.
The pane provides two main methods for your Mac to communicate. Enable Speak announcements to have your Mac alert you when it needs your attention. And by using Speak selection when the key is pushed, a custom keyboard shortcut will cause your Mac to read the selected text aloud.
This second option may seem peculiar, yet it is quite beneficial when proofreading content. When words are read aloud, you frequently notice errors that you would have missed if you had read them silently.
Make your Mac work in silent spaces
You can mute your Mac using its mute key, but Accessibility Features on mac includes a handful of helpful settings for retaining critical interactions in environments when silence is required. Enable Flash the screen when an alert sound happens under Audio. When an alarm occurs, your screen will flash briefly to attract your attention.
Turn on Enable Type to Siri in Siri. This allows you to text inquiries to Siri instead of speaking them. Note, however, that this disables the standard functionality. Therefore, if you prefer speaking to Siri, deactivate this setting when you return to a setting where speaking is not frowned upon.
I am currently using MacOS Monterey, if you want to check out other accessibility features on mac, what are the other accessibility features that you can enable or disable on your mac, you may refer to here.


